040 Level — User Manual
Great that you're here. This manual will show you step by step everything you need to know — from unpacking to a perfectly leveled parking spot.
You'll need: your 040 Level Sensor, your smartphone (iPhone or Android, with Bluetooth turned on) and a few minutes of quiet time.
Tip: If the text is too small, switch to the larger view under Settings → Display → Larger Display.
If something is unclear — check Terms & Concepts at the bottom.
⚠️ Please read first – Safety when driving on Before you drive on, a few honest words: Look around – enough space, no obstacles, solid ground. The wedge calculation is an approximation. Loading, weight distribution and suspension travel change the result. No ground is perfectly flat – and wedges can sink. Measure again after driving on. Always secure your camper against rolling away – engage parking brake, use wheel chocks. Use at your own risk. We give you reference values, no guarantee – the responsibility remains yours.
📡 Important to understand – measure only at a standstill The 040 Level is a highly sensitive tilt sensor that also uses acceleration values. While driving, over bumps, when wobbling or through vibration, the readings jump noticeably – that's not a malfunction, just normal measurement physics. So always measure at a standstill. In the expert menu you can fine-tune the smoothing: it averages the most recent readings and calms the display. This costs a slight delay – also not a defect, but intentional. The smooth routine in practice: drive onto the spot → pause for a moment → are all pills yellow? → switch on the wedge calculation → place the wedges at the shown position → drive up slowly and carefully → check in between → green? Done. If not, drive up a little more or back off slightly.
1. What is 040 Level?
040 Level consists of two parts that work together:
- The Sensor – a small, round wireless sensor with a battery that you mount permanently in your vehicle. It measures how tilted your vehicle is and sends this measurement via Bluetooth to your phone.
- The App – shows you the tilt in real time and calculates how to get your vehicle level ("in the water").
The app measures two values: longitudinal tilt (front/rear, "Pitch") and lateral tilt (left/right, "Roll"). The goal is always: both as close to 0° as possible.
Good to know You don't need to be exactly level. A few degrees of residual tilt is barely noticeable in the camper – the app helps you quickly get "good enough."
2. Delivery contents
- 1× 040 Level Sensor (with CR2477 button cell inserted)
- Adhesive tape for mounting
- Access to the app (free on App Store / Google Play)
Download the app for free from the App Store (iPhone) or Google Play (Android).
3. Install app & grant permissions
- Search for "040 Level" in the App Store or Google Play and install the app.
- On first launch, the app asks for Bluetooth – this is mandatory, because only via Bluetooth does the sensor communicate with your phone.
- On Android phones, Location is also requested. This is an operating system requirement for Bluetooth devices – please allow. (Your location is not tracked; see Privacy.)
iOS 13.0+ / Android 6.0+
Tip for later Keep the app up to date with updates. New features and improvements come regularly – only with the latest update you get them.
4. Activate sensor for the first time
- Unscrew the cap on the back of the sensor and check that the battery (CR2477) is inserted (positive pole facing up).
- Press the small button inside for about 3 seconds until the small light (LED) starts blinking. Now the sensor is active.
- Screw the cap back on.
⏱️ Important: the 30-second rule After activation, you only have about 30 seconds the first time to connect with the app. If you can't do it, the sensor goes back into deep sleep to save power – then simply press the button again for 3 seconds and try again right away.
Tip: First try out the sensor comfortably at home before installing it in your vehicle.
5. Mount sensor in vehicle
For the app to calculate correctly, the sensor must be mounted the right way. On the sensor's label, you see two arrows: one red and one white.
The golden rule: one arrow points in a vehicle direction
One of the two axes must cleanly point in a main direction of the vehicle. Examples:
| Mounting position | Red arrow | White arrow |
|---|---|---|
| Sensor lying flat | pointing forward (direction of travel) | pointing right |
| Sensor lying flat, other way | pointing forward | pointing left |
| Sensor standing upright | pointing up | pointing right |
These are just examples – what's important is that both arrows cleanly point in one vehicle direction each.
In the app, you then set both arrow directions (red AND white) – see Sensor Configuration. From this, the app calculates itself what "front/rear" and "left/right" means.
Mounted crooked? No problem If you mounted the sensor slightly off, you can fine-tune this in the app (rotation axis / fine calibration) – you don't need to remove it.
⚠️ Caution after every cap opening The level electronics are in the cap, not in the base unit on the vehicle. Every time you open the cap (e.g., for battery change or button press) and screw it back on, the position can change by a few degrees. Best to screw the cap back on so the axis again points cleanly in the perfect vehicle direction. Then re-zero (see Zeroing) and – if the cap is slightly twisted – also correct the degree value in Sensor Settings → Expert (rotate axes / fine calibration).
6. First launch introduction (Walkthrough)
When you first open the app, it walks you through everything important in short steps. You can view this introduction again anytime (Settings → Help → Quickstart).
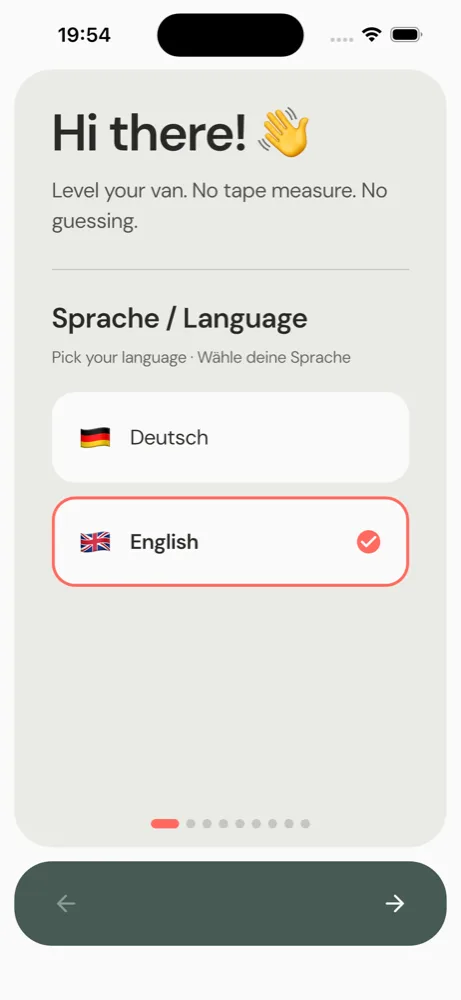
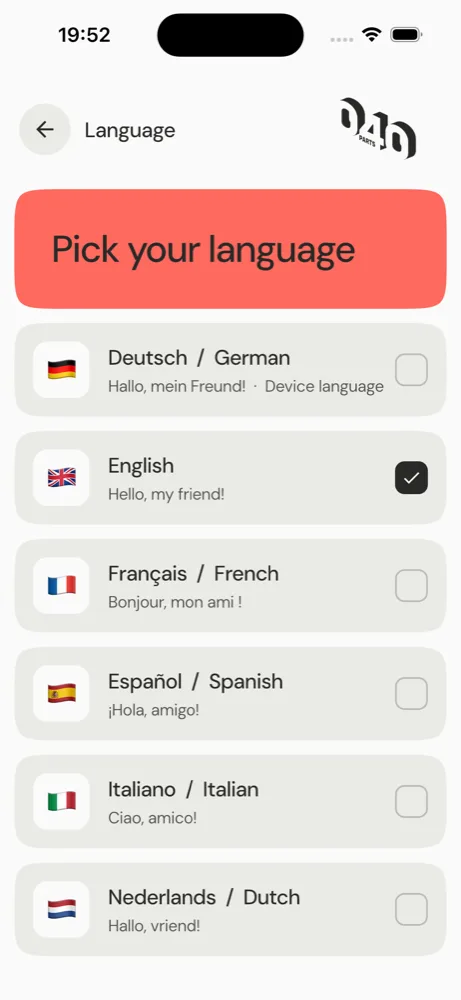
- Choose language – select your language (24 languages available). Initially, the app only shows your system language or English; the full selection is available anytime in the Settings menu.
- Start sensor – remove cap, press button for 3 seconds.
- Connect – turn on Bluetooth, tap sensor.
- Mount – attach sensor flat or upright, align arrow.
- Vehicle type & dimensions – Caravan, van, motorhome … plus optional track width/wheelbase and your driving aids. The more precise, the better the wedge calculation.
- Age group (voluntary) – helps us improve the app.
Tap <code>Continue</code> to step through, or <code>Skip</code> to skip.
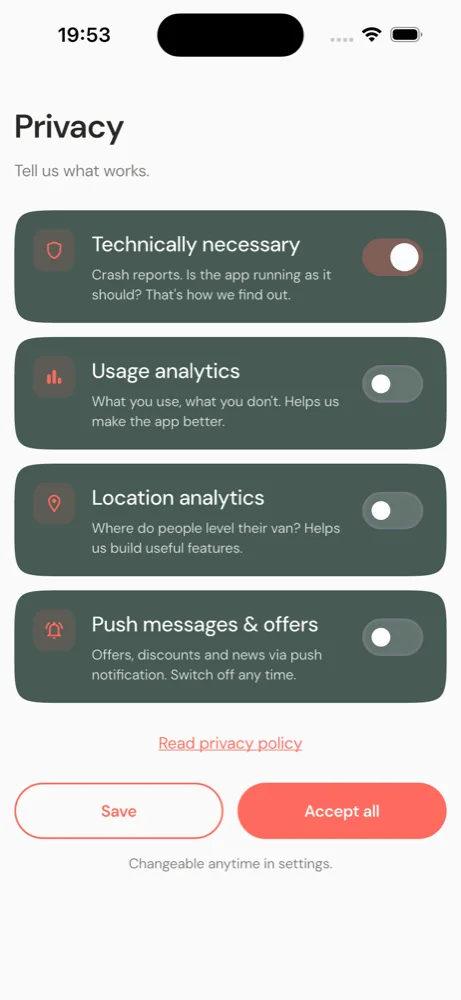
7. Privacy & what data is sent when
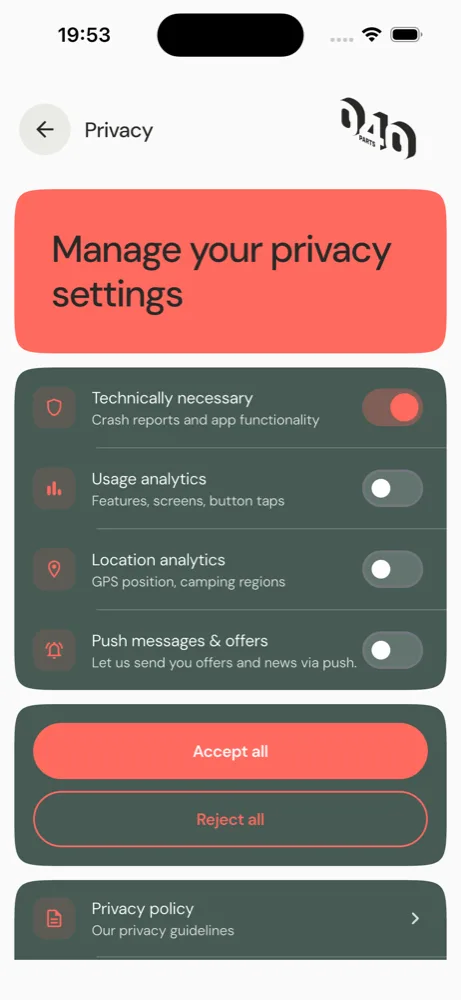
Right at the beginning, the app asks what you want to allow. You decide – and you can change everything anytime in Settings. There are four levels:
| Level | What for | Default |
|---|---|---|
| Technically required | Crash reports – so we know when the app doesn't work as it should. Cannot be turned off. | always on |
| Usage analytics | Which features are used (anonymously) – helps us improve the app. | off |
| Location analytics | In which regions people level (coarse). The Weather widget also depends on this. | off |
| Push & offers | News and offers notifications. Can be turned off anytime. | off |
In short: The app sends only very few, anonymous data – and only those that help develop the app further. With <code>Accept all</code> you allow everything, with <code>Save</code> only your selection. The full privacy policy is linked directly.
8. The status bar at the top
No matter which view you're in – at the top you always see your sensor's status:
| Element | What it shows & what you can do |
|---|---|
| 🌡️ Temperature | The temperature measured by the sensor. Tap it to switch between °C and °F. The color changes from black (cool) through yellow to red (hot). |
| Sensor name (center) | Your connected sensor's name. Tap it to open the sensor list, select another sensor, or disconnect. If nothing is connected, the field pulses slightly. |
| 📶 Signal | How strong the Bluetooth connection is (more bars = better). |
| 🔋 Battery | Charge level of the sensor. If the battery gets low, the icon turns yellow, then red. |
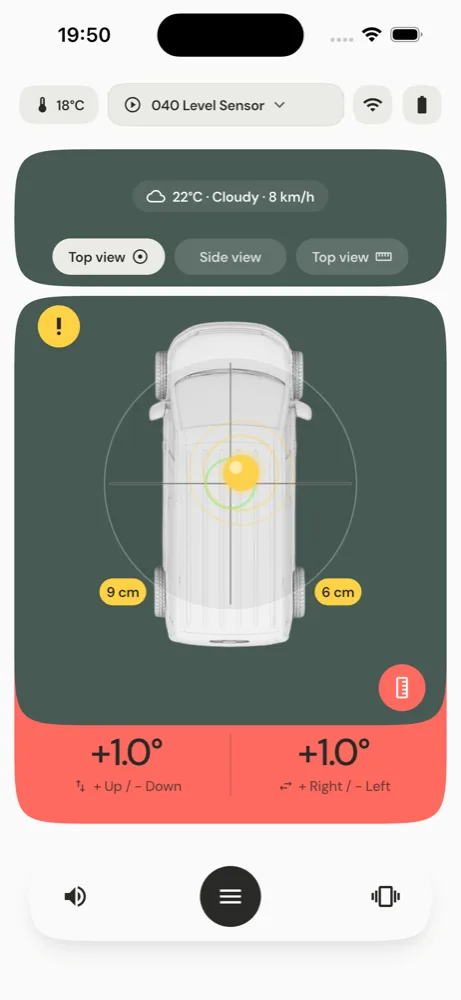
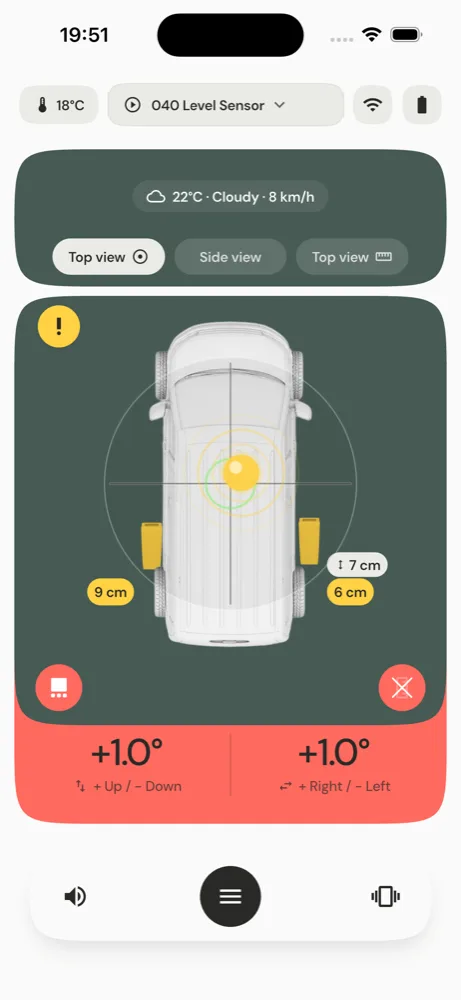
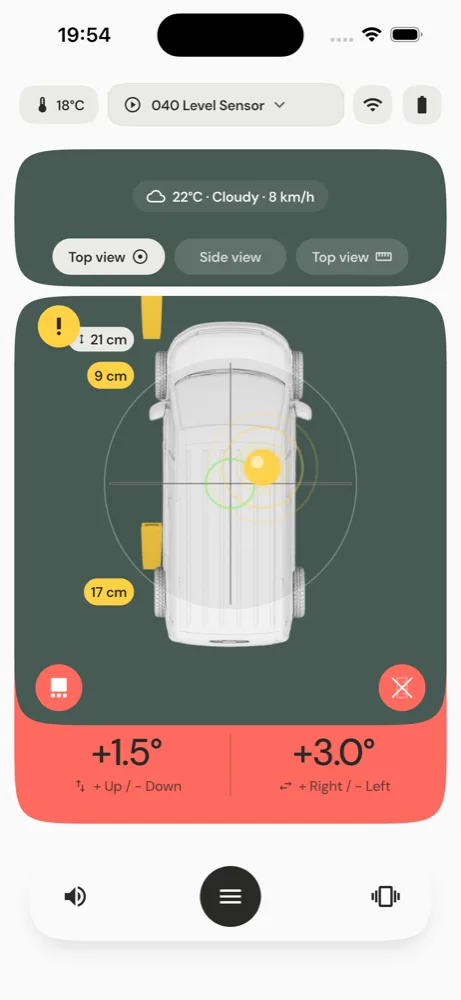
9. Top view with spirit level
The first view shows your vehicle from above with a round spirit level (like a classic bubble level). The bubble moves in the direction your vehicle is tilted. If everything is within tolerance, the display turns green; otherwise yellow or red.
You switch between views by swiping left/right or tapping the toggle pill at the top right.
10. Side view
Here you see your vehicle from the side, with two large values:
- Up / Down (Pitch): how much the front or rear is hanging. Plus = front high.
- Right / Left (Roll): how much the left or right side is hanging.
With the small toggle pills at the top left, you can rotate the view direction (from front / from rear) and swap the sides – so the display matches your actual view of the vehicle.

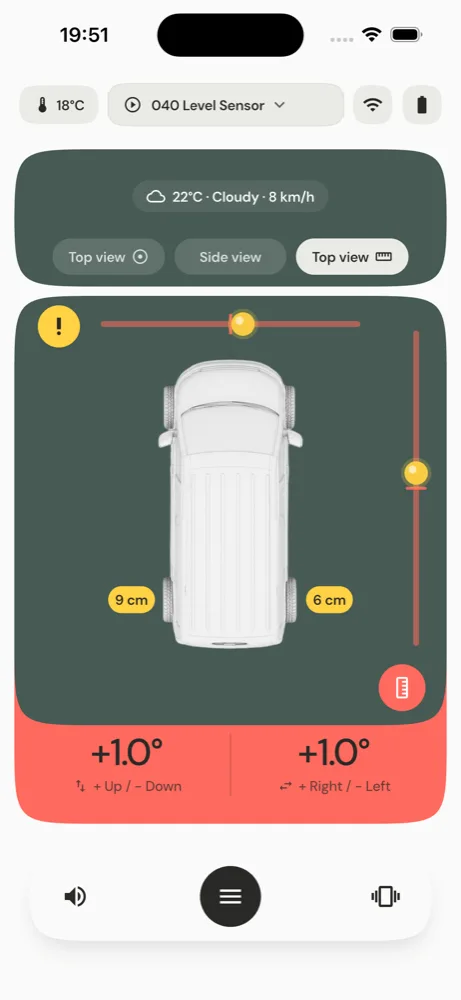
11. Top view with level gauge
The third view shows two linear level strips (one for front/rear, one for left/right). Some people prefer this display over the round spirit level – try out what works better for you. Switch via the pill at the top right.
12. The colored pills at the wheels
This is one of the most important displays. At the wheels, small "pills" appear with a number – they show live how many centimeters that wheel would need to be compensated. The color tells you immediately:
- Green – This wheel is level.
- Yellow – Compensation is needed here, but your driving aids are sufficient.
- Red – Your driving aids are not sufficient – the ground is too sloped. Change parking spot or park differently.
The pills automatically "jump" to the wheels where compensation is needed. This way you can see while slowly driving forward – even before you start the wedge calculation – whether your parking spot works.
Prerequisite For the cm values to be correct, your vehicle dimensions and driving aid dimensions should be stored in settings (see Design & Vehicle).
13. The weather widget
At the top of the views, a slim chip shows the local weather (e.g., "22°C · Cloudy · 12 km/h"). This is purely a comfort extra and has nothing to do with leveling.
- Tap opens the detailed weather view with 7-day forecast.
- Long press refreshes the weather.
Weather data comes from the free service Open-Meteo and needs your approximate location. If you haven't allowed Location analytics, it says "Weather: location off" – that's fine, the app works just as well without weather.
15. How it works in practice – Step by step
This is how most people use their 040 Level. You don't need to memorize anything – the app guides you:
- Leave home. The sensor is permanently in the vehicle, the app is set up (vehicle type, dimensions and your wheel chocks are entered once).
- Arrive at parking spot. You choose a spot.
- Open app. The sensor connects automatically. Name, temperature, battery and signal appear at the top.
- Park forward slowly. Pay attention to the colored pills at the wheels: They already show whether your driving aids are sufficient for this spot (green/yellow = good, red = too sloped).
- Found a good position (everything yellow or already green)? Then tap Wedge Help at the bottom.
- Read wedge instructions. The app now shows exactly where which wedge goes.
- Place wedges, get in, drive on slowly and carefully.
- Done. Ideally, your vehicle is now level. A quick cross-check never hurts.
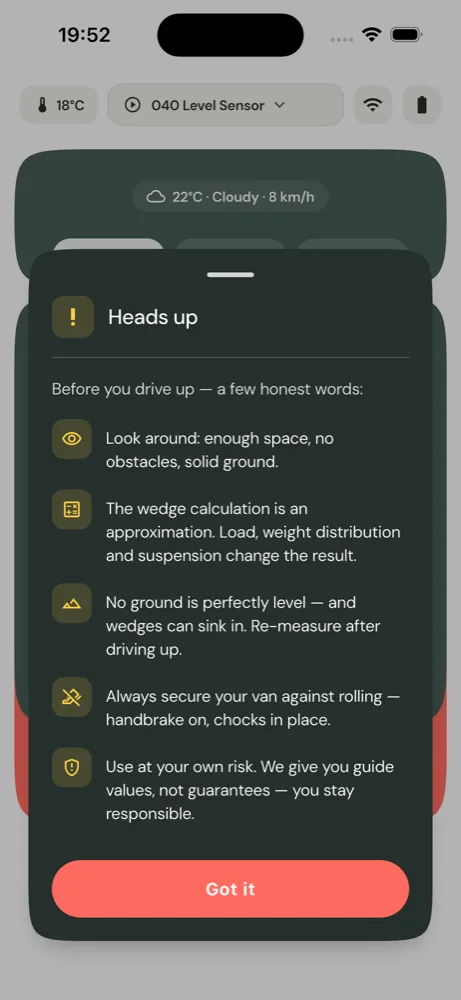
⚠️ Always remember The calculation is a theoretical help, not an exact science. Always drive on slowly and with awareness of your surroundings. Apply parking brake, secure against rolling away.
16. Zeroing (Calibrating) – the most important step
"Zeroing" means: You tell the app once what "level" means for your vehicle. Because hardly any sensor is mounted perfectly level in the vehicle.
- Park the vehicle on a as flat as possible surface (e.g., in the garage or driveway).
- Tap Zeroing at the bottom – or in the sensor menu, swipe the "Zeroing" area to the right.
- Hold still briefly (the app measures for about 1 second). After that, it says "Zeroed." – from now on, the app shows all deviations from exactly this point.
If you need it very precise, you can long press "Zeroing" in the sensor menu to manually enter or reset the zero points.
⚠️ Re-zero when … you've re-mounted the sensor, opened the cap (battery change) or changed the orientation in the app. The zero point is not automatically adjusted when changing orientation.
17. Enable wedge calculation
In the top view, you turn on wedge calculation with a switch. The app then calculates for your current position where and how high you need to drive on, and draws the wedges directly at the wheels.
Recalculate? There's no separate "Recalculate" button – simply toggle wedge calculation off and on briefly, then the app recalculates with your current position.
Only in top view The wedge instructions intentionally only appear in the top view. The side view shows no wedge help – that's intentional to keep it clear.
18. Wedge with or without white pill – where to put it?
This is the crucial trick for placement:
- Wedge WITHOUT white pill → slide it directly against the tire. You drive onto this wedge completely.
- Wedge WITH white pill – the pill shows a distance in centimeters. Place the wedge that far in front of the tire contact patch. You then drive onto the wedge only as far as needed for the compensation.
Why this works: A wheel that only needs to be lifted slightly doesn't need the full wedge height – so you place the wedge a bit in front of the wheel so you only drive up partially. The highest wheel to be lifted gets the wedge directly against the tire.
| Wedge display | Meaning |
|---|---|
| no white pill | Wedge directly against the tire |
| e.g., "42 cm" | Place wedge 42 cm in front of the tire |
Only 1 wedge? With just one wedge, it rarely becomes perfectly level – for proper support, you usually need two or more. The app tells you this too.
19. The button with the yellow exclamation point
The yellow exclamation point is always visible. When you tap it, the app shows the most important safety notes. You can also tap directly on the vehicle or the wedges to get more help.
Quick check – before you drive on: - Look around: enough space, no obstacles, solid ground. - The wedge calculation is an approximation. Loading, weight distribution and suspension travel change the result. - No ground is perfectly flat – and wedges can sink. Measure again after driving on. - Always secure your van against rolling away – engage parking brake, use wheel chocks. - Use at your own risk. We give you reference values, no guarantee – the responsibility remains yours.
The app also warns when the ground is too sloped for your wedges: "Ground too sloped, change parking spot." Then even the best wedge won't help – find a flatter spot.
20. Why it's only an approximate value
The app calculates with a simplified model: it assumes your vehicle is a rigid plate. In reality, every vehicle is different:
- Loading & weight distribution – a fully loaded rear end suspends differently.
- Suspension – the tires and chassis give way.
- Ground – wedges sink into grass or gravel; a few centimeters further, there's often already another dip.
That's why: The wedge calculation gets you quickly very close to level. You do the final fine-tuning by feel – and as said, a few degrees is barely noticeable in the camper anyway. See the app as a smart alignment aid, not a precision instrument.
21. Other driving aids: Pads, jack, drawbar
Instead of wedges, you can also store lifting pads or a car jack in the settings. Then the instructions say "inflate / lift until everything turns green" instead of a wedge position.
If you have a trailer/caravan, the drawbar is taken into account: The app tells you how many centimeters you need to crank it up or down, instead of placing a front wedge. If the crank's adjustment range isn't sufficient, the app points this out (additional wedge or different spot).
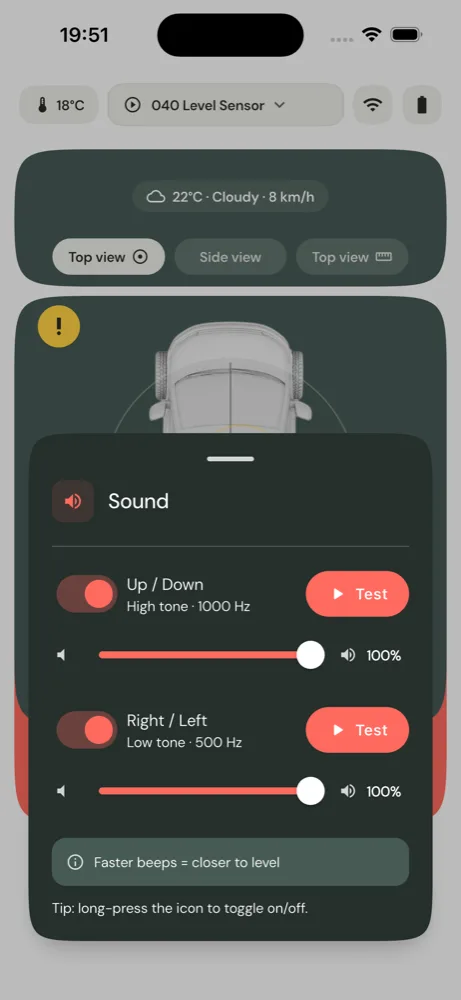
22. Sound menu
When driving on, the app emits sounds like a parking sensor – the faster the sounds, the closer you are to level. In the sound menu (button "Sound") you configure this:
- Up / Down (high tone, 1000 Hz) – switch on/off + volume. With the test button, you can hear it.
- Right / Left (lower tone, 500 Hz) – same, switch, volume, test.
This way you can distinguish by sound which axis is being indicated. Long press the sound button to quickly toggle sound completely on/off.
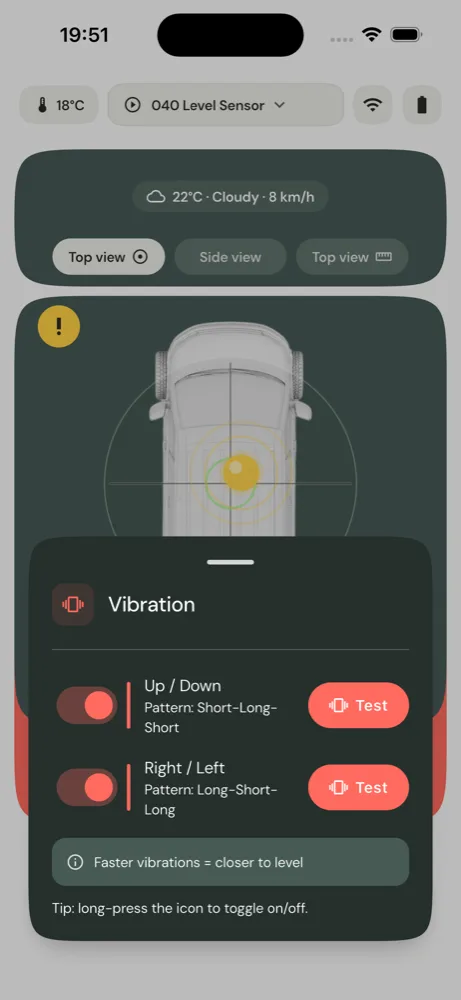
23. Vibration menu
Those who prefer it quieter can use vibration instead of sound. Here too, per axis:
- Up / Down – pattern "short-long-short".
- Right / Left – pattern "long-short-long".
Each axis individually on/off, with test button to try it out. Same here: faster vibrations = closer to level.
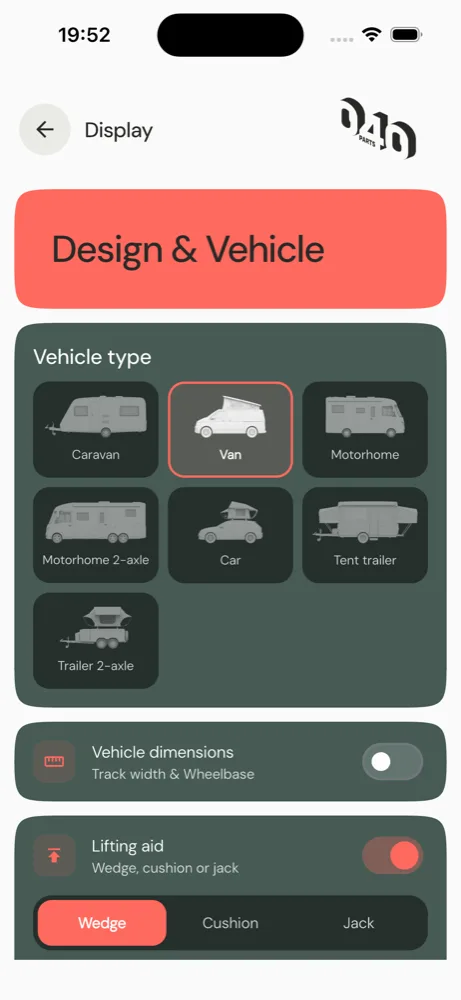
24. Design & Vehicle
Here you set up your vehicle – this is the basis for the wedge calculation:
- Vehicle type – Caravan, van, motorhome, motorhome (dual axle), car, tent trailer or dual axle.
- Larger display – turns on larger text and larger buttons everywhere.
- Vehicle dimensions – track width (axle width) and wheelbase (axle distance), for dual axles also their spacing. The more precise, the more accurate the wedge heights.
- Driving aid – type (wedge / pad / jack) and quantity. For wedge, you enter length and height, for pads/jack the maximum lift height.
- Length unit – switch between cm and inch.
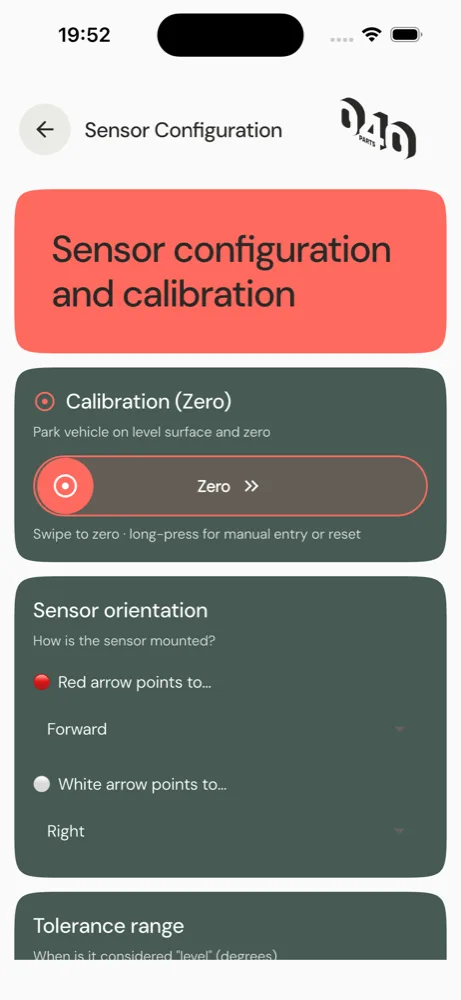
25. Sensor Configuration
Everything around the sensor itself:
- Zeroing (calibration) – as described in Section 16. Swipe to zero, long press for manual entry/reset.
- Sensor orientation – here you set where the red and white arrows point (front/rear/left/right/up/down). The app checks that they are perpendicular to each other.
- Tolerance range – at what deviation the app still shows "Level" (green). Small = very precise, large = more relaxed.
Expert settings
- Smoothing – calms jittery values (0 = off).
- Fine calibration Up/Down and Right/Left – tiny manual correction (−45° to +45°), if the sensor is slightly off.
- Rotate axes (Yaw) – rotates the coordinate system slightly left/right if the sensor is mounted at an angle or the cap is twisted.
- Temperature offset – fine correction of displayed temperature.
- Decimal places – how precise the degree values are displayed (0, 1 or 2 decimal places).
- Maximum deflection – how many degrees the slider/spirit level shows at full scale.
Reminder After changing orientation, always re-zero.

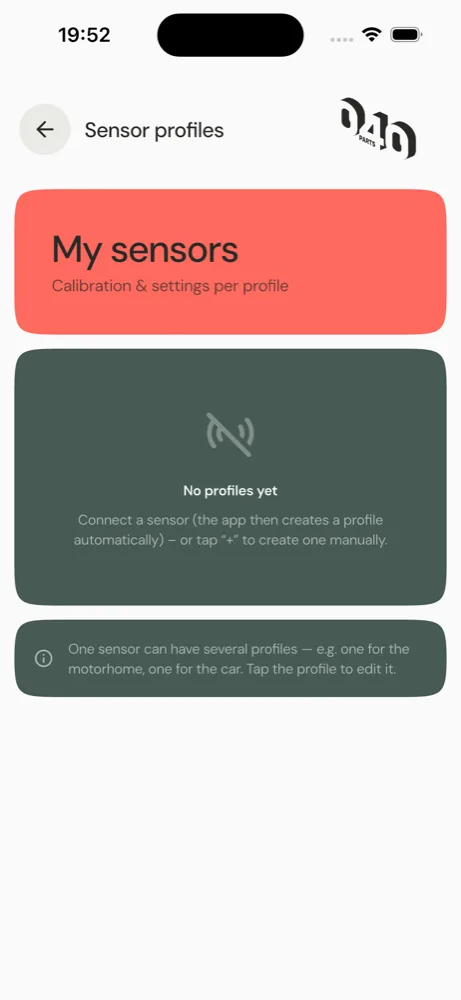
26. Sensor Profiles (multiple vehicles, one sensor)
Have multiple vehicles but only one sensor? No problem with profiles. A profile stores vehicle type, dimensions, driving aids and the zeroing – everything that makes up a vehicle.
- Create new profile – via the + button on the active profile. A copy is created that you can then adjust.
- Rename – change the name in the profile (e.g., "Caravan" / "Motorhome"). You can also rename the sensor directly in the sensor list (there long press the sensor).
- Switch profile – tap the desired profile. The app immediately loads the matching vehicle including dimensions and wedges.
- Delete – in the profile via "Delete" (with confirmation prompt).
This way you simply move the one sensor from one vehicle to another and select the matching profile in the app.
27. Language
The app speaks 24 languages. Tap your language – the app switches immediately. (This manual is also available in several languages.)
28. Privacy & Analytics
The same four levels as at first launch (see Section 7) can be changed here anytime: technically required (always on), usage analytics, location analytics, push & offers. You'll also find the Privacy Policy here and the option to request data deletion (resets your analytics settings).
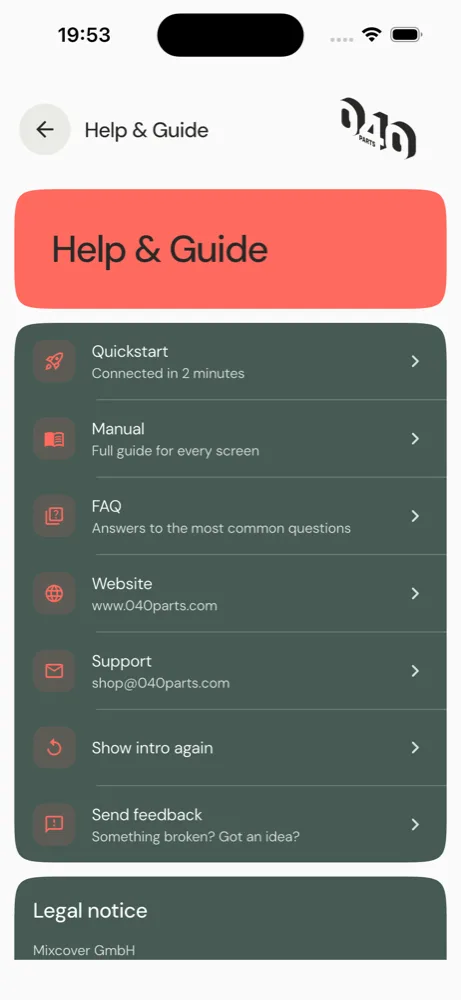
29. Help & Manual
Here you find support:
- FAQ / Frequently Asked Questions – quick answers directly in the app.
- Quickstart – view the introduction from the beginning again.
- User Manual – this handbook.
- Website & Support – link to website and contact via email.
- Give feedback – directly from within the app.
- Imprint – legal information.
🐛 Found a bug? Please report it! If something seems strange or an error occurs, you can report it directly in the app: Help → Give feedback. Select "Bug" or "Idea", briefly describe what happened, and attach a screenshot if desired. You can provide your email if we have follow-up questions. Every report helps us improve the app – thank you very much!
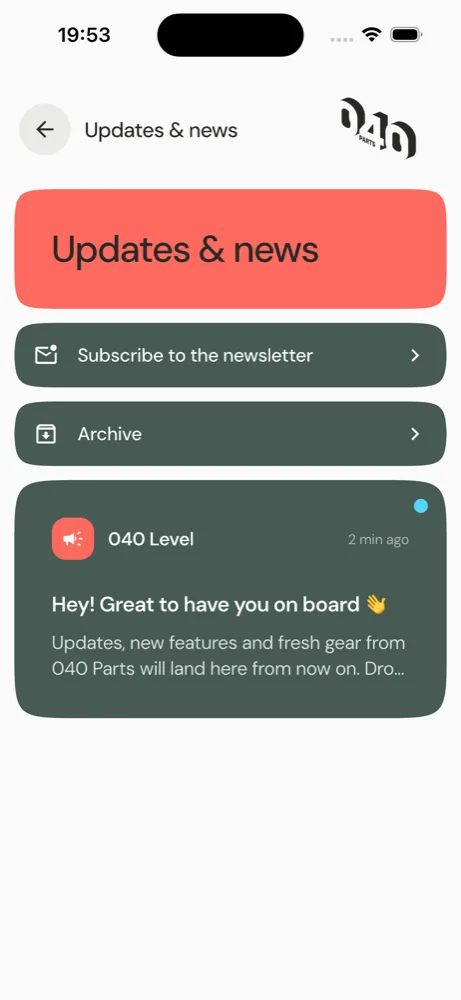
30. Updates & News
Under "Updates & News" (also accessible via the bell/campaign symbol at the top in settings) you'll find news from 040 Level: new features, tips, fresh accessories. Unread items are marked with a dot.
- Tap opens the message in full length; it's marked as read in the process.
- Mark all read marks everything at once.
- Done moves a message to the archive, which you can open separately.
32. Troubleshooting
| Problem | Solution |
|---|---|
| Sensor not found | Bluetooth on? Press button for 3 seconds (LED blinks). Connect within ~30 seconds. Move phone closer to sensor. |
| Connection drops | Check range/signal, check battery. The app usually reconnects on its own. |
| Values show tilted even when level | Re-zero on flat surface. Check orientation (red/white). |
| Values jitter | Increase smoothing in expert settings. |
| Pills are red | Ground too sloped for your driving aids – change spot or park differently. |
| Inaccurate after battery change | Cap changes position – check orientation and re-zero. |
33. Battery replacement & care
The battery (CR2477) lasts up to several years depending on use. To replace, unscrew the cap with the tool, remove old cell, insert new CR2477 with positive pole facing up, close cap. Then check orientation and re-zero.
Clean only with a dry, soft cloth – no water, no solvents.
⚠️ Button cells are dangerous A swallowed button cell (CR2477) can cause severe internal burns within 2 hours. Keep sensor and battery away from children, always keep battery compartment tightly closed. If you suspect swallowing, seek medical attention immediately.
34. Technical specifications
| Property | Value |
|---|---|
| Product name | 040 Level Sensor (Art. FBM_158_1_Level_App) |
| Radio chip | Nordic nRF52 series |
| Housing | Round, ABS · Ø 38.6 mm × 15.7 mm · approx. 25 g |
| Protection class | IP67 (dustproof, 1 m / 30 min waterproof) |
| Battery | CR2477 (3 V, replaceable) · up to approx. 48 months |
| Operating temperature | −40 °C to +70 °C |
| Radio | Bluetooth Low Energy 4.0/5.0 · 2.4 GHz ISM · −40 to +4 dBm EIRP |
| App | iOS 13.0+ / Android 6.0+ |
35. Disposal
The 040 Level Sensor must not be disposed of in household waste (electronic waste, WEEE). Take it to a collection point. Don't dispose of used batteries in household waste either – return them to the store or recycling center.
36. Terms & Concepts
| Term | Meaning |
|---|---|
| Pitch (Up/Down) | Longitudinal tilt front/rear. Plus = rear higher than front. |
| Roll (Right/Left) | Lateral tilt. Plus = right side higher. |
| Zeroing / Calibrating | Tell the app: "how I'm standing now is level." |
| Tolerance range | How precise you are – within = green. |
| BLE | Bluetooth Low Energy – power-saving Bluetooth variant. |
| IP67 | Dustproof and temporarily waterproof. |
| Deep sleep | Power-saving mode of the sensor – wake with button press (3 sec.). |
| Yaw | Rotation around the vertical axis – correction for obliquely mounted sensors. |
| CR2477 | Button cell: Lithium, 24 mm diameter, 7.7 mm height. |
37. EU Declaration of Conformity
The full EU Declaration of Conformity (DoC-040LS-001-2026) for the 040 Level Sensor (Art. FBM_158_1_Level_App) is available as a separate page:
→ View EU Declaration of Conformity
Manufactured by: Mixcover GmbH · Neumann-Reichardt-Str. 27–33 · 22041 Hamburg · Germany
Directives: RED 2014/53/EU · RoHS 2011/65/EU · WEEE 2012/19/EU
See you on the road — euer 040 Team